One of my favorite applications in the Google Workspace system is Google Sites. Not only do they give teachers an incredible tool for building digital lessons, but allow students to quickly create stunning online portfolios to showcase their accomplishments. They are easy to create, simple to manipulate and can be organized inside of your Google Drive to keep you well prepared for future lessons. However, today we are going to talk about one of the big pain points for teachers. Today, we are going to take a look at Publishing Settings in Google Sites and why you should always check to make sure you aren't accidentally giving permission to your users to do things you don't want them to do on your website.
Where Google Sites is a very easy application to learn and quickly get up and running with, many are having issues understanding some of the publishing settings and how collaboration works. Let’s take a moment to dive into Google Sites to fully understand how to share your new website with your audience.
What Are Google Sites?
Google Sites is the free website builder found in Google Workspace. It was revamped and recreated in the summer of 2015 and since then has gone through a number of fantastic updates to provide additional functionality to users.
Google Sites can be located in a variety of places:
- sites.google.com/new (to open the Sites Dashboard)
- sites.new (creates a new Google Site)
- Inside of Drive, click on NEW – MORE – GOOGLE SITES (best if this is done from inside a folder you wish to save it in)
Does Google Sites Have A Save Button?
No … technically, Google Sites does NOT have a save button. The system, (like Google Docs) automatically saves your work every second inside of Google Drive. However, once you officially publish your work, you now have two different versions of your website to manage, your published website, and your editing canvas.
Does Google Sites Have A Revision History Setting?
Again … No … technically.
There are two actual answers for this question.
The first answer comes from a Google Support forum that states that this feature is on the roadmap but currently does not have a date to be released.
The other comes from one of my favorite websites, STEEGLE, who had a fantastic tutorial on a process for getting revisions but as they have recently posted … this feature is now no longer available.
Let's hope that this is a feature that comes out sometime in 2019.
How Does Publishing Work in Google Sites?
Once you are at a point where you would like to share your work with others, you should click on the blue PUBLISH button on the top right of the screen.

Publish the Web (Settings Panel)
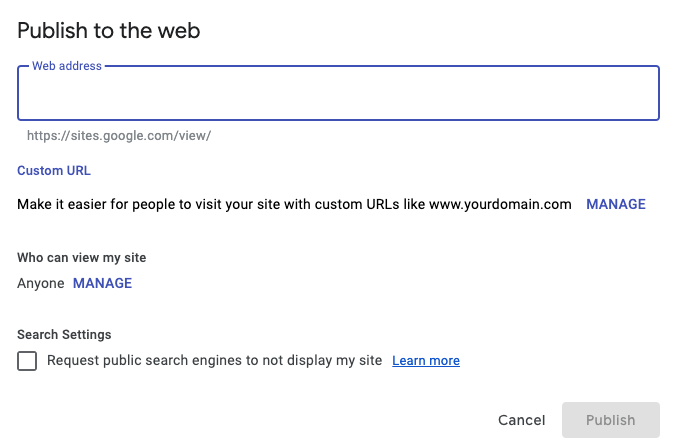
This menu gives you several options to save and publish your work for others to view.
Web Address:
This is your website address. There are two possible URL combinations for your Google Sites:
- sites.google.com/schooldomain/…
- sites.google.com/view/…
The first of these is for your business or school. The URL will automatically be set up to include your EDU or work domain. The second of these options is for all other users of the application. This is a pro and a con at the same time … meaning, just like a .com address that you would go purchase you should think about securing your Google Sites domain just in case someone else comes along and wants sites.google.com/view/YOURNAME.
Custom URL:
If you have your own domain name and would like to display it instead of “sites.google.com/…” you can include it here. There is a nice tutorial for this process on the STEEGLE website.
Who Can View My Site:
This will provide an additional menu where you can choose how others will interact with your website. (More on this below)
Search Settings:
This is a button that often causes teachers to get sweaty palms. If you are creating a website for your school, you might want to click this button to request that Google NOT show your content in its search directory.
How Do I Add Collaborators?
Before going any farther, it's important to understand where Google Sites fits into the Google Workspace family. In terms of vocabulary and how things are setup, Google Sites has more of a brother/sister relationship to Google Forms rather than Docs/Sheets/Slides. This is because, as with Forms, it has a published and edit side. This often causes a bit of problem for new users who aren't familiar with certain terminology.

Share with Others (Settings Panel)
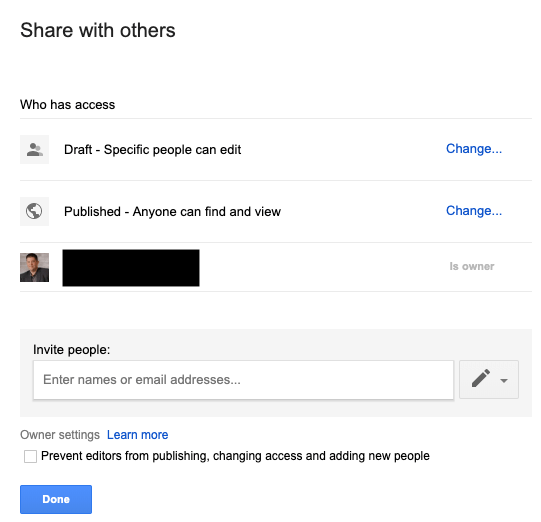
The Share with Others menu has three sections, Draft, Published and at the bottom, a list of specifically who you have given permission to edit the document.
Draft:
The Draft section refers only to having access to the EDITED VERSION of your website. This is where teachers get into trouble. They see the button that says “On – Public on the web” and they think that this means they should click it in order to have others view their published website. Instead, this is actually giving strangers permission to EDIT the website.
The Draft Settings have three options:
- On – Public on the web
- On – Anyone with the link
- Off – Specific People
My advice here is to keep it to OFF unless you have a specific reason for opening up editing access to your website. A good example of this would be if you are looking to do a project with your students where everyone could enter the website and make edits all a the same time.
Published:
The Published section refers to how your website will function after it's up and on the web.
There are two options for you to click on:
- Anyone can find and view the published version
- Specific people can view when published
These two options are very powerful. The first option (anyone can find) is the traditional setting that allows the majority of users to have access to your content.
The second option (specific people can view) however is a great feature when wanting to limit who can see your website. In other words, this can give you the ability to create a “Membership Website.”
On TeacherCast, we use this option for our Tech Coach Mastermind program. With this being triggered on, only people we specifically setup can see the website and they must be signed into their Google Accounts to do so.
Invite People:
This setting works very similar to Docs/Sheets/Slides. You can invite a specific person or group or people to have access to your website.
You then have two other options:
- Can Edit
- Can View Published
Use the second option if you are setting up a membership site, or a website where only your teachers or students can see the work when logged in.
Owner Settings
The very bottom of the Share with others menu gives the owner of the Google Site the ability to limit what rights other users have by granting them access (or not) to prevent editors from publishing, changing access and adding new people. (I often check this box)
What Happens After You Publish Your Website?
Once you publish your website, you now have two “versions” of your website, a Published and an Editing Canvas.
The published version is the one that everyone will have access to once you share the website URL with them.
The editing side is simply for you (or your collaborators) to continue working on. The website will continue to save itself every second while you are working, but the only way that your public users will see the updates is when you hit the PUBLISH button again.
Meaning: You can work on editing your website for days or weeks without hitting the publish button again and everything will be saved.

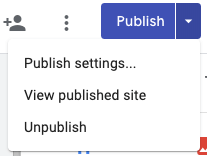
After publishing, you will see an arrow to the right of the blue PUBLISH button with three options.
- Publish Settings – This menu option brings you back to your publishing settings where you can adjust the privacy of your website.
- View Published Site – This is the key menu option that takes you to your public website based on the website address you set up when publishing.
- Unpublish – This menu option will unpublish your website and “remove” it from the world wide web.
It is important to understand that your website does NOT need to be unpublished while you are editing it. After you hit the publish button, you website will simply take 3-4 seconds to publish any changes you make to the live website. You can then go back and make as many changes as you want, for as long as you want and your users will NOT see those changes until you again hit the blue PUBLISH button. As stated above, your website will automatically save every few seconds, but this will NOT affect your live site until you hit the publish button once again.
What should I NOT be doing when thinking about publishing?
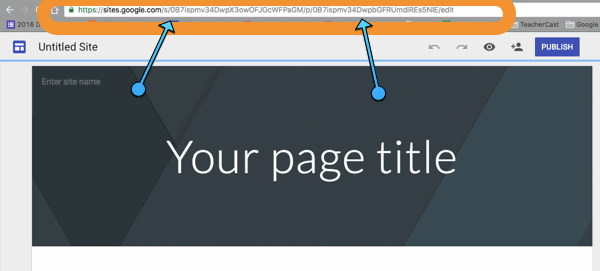
Many Google Sites web developers have been making one key mistake when it comes to their publishing settings. They are using the actual URL (web address) of their EDITABLE website and giving this out to their students and users. This web address might look something like this:
Notice at the end it says “/edit”???

What is actually happening in this situation is that website creators are sending their students the EDITABLE version of their website and this of course, allows students to EDIT their teachers website.
Is that the only mistake when it comes to publishing?
Another thing that Google Sites web developers are doing is opening up their sharing settings to the world. Remember from above, you have a blue PUBLISH button and then you have the button with the person that allows you to add editors. Several people are by accident changing their editing settings to “On – Public to the web.” This makes total sense as it is what you would generally do with a traditional Google Doc. However, in Google Sites, this is basically saying … ANYONE THAT IS IN THE WEBSITE IS NOW A FULL EDITOR OF THE WEBSITE.
I think I understand …. What should I do to publish my website?
Here are my recommendations when working with the new Google Sites.
- Only use the person/plus button when you want to make someone else an EDITOR of your website.
- When you are ready to make your website go “live,” hit the blue PUBLISH button and name your website something unique.
- When giving out the website to your website ONLY use the link that looks readable.
- sites.google.com/view/??
- sites.google.com/yourdomain.com/??
Google Sites Publishing Settings: FAQ
Can I change my Published Google Sites URL once my site is published?
Yes: You can change your Published Google Sites URL at any time as long as it's available (not being used by another website).
To change your URL, click on the PUBLISH SETTINGS button and adjust as needed. You do not need to unpublish first. Just keep in mind that this breaks any URL that you might have given out to your users.
What happens if my URL is not available?
At this point, if your URL is not available, you will have to choose a different URL path by either adjusting the URL slightly … or completely.
How can I find additional help with creating a website on Google Sites?
If you are looking for tips, tricks, or help in creating a Google Sites website, I'm happy to sit down with you (or your entire teaching staff) and provide 1:1 support. Please click on my calendar to book a session with me.
In Conclusion
Over the last 4 years, I have helped teachers and students create hundreds of Google Sites. I love that they are easy to use and simple to manipulate. When it comes to publishing settings, there are a few things to look out for so you don't accidentally find that someone has hijacked your beautiful website, but if you follow the steps above you certainly will be fine. If you have any questions, please don't hesitate to ask.
For more information, please visit our Google Sites page or www.EducationalWebDesign.com.
Please Like, Subscribe, Follow … and Share!
Subscribe to my Newsletter
Social Media
Audio Podcasts
Contact Me
- Email: feedback@teachercast.net
- Contact Page: TeacherCast.net/Contact
Let's Chat
- Visit My Bookings Page
- Professional Development
- Invite me to your school, conference, or company for a professional learning opportunity, featured speaker role, or keynote speech
- Smore: The Ultimate Tool for Educators' Newsletters and Communication - August 28, 2024
- Google Keep for Instructional Coaches: Building an Effective Short-Term Memory System To Help You Stay Focused and Organized - July 29, 2024
- Empowering Neurodiverse Learners: SMART Technologies’ Innovative Edtech Solutions - July 17, 2024

